Nov 9, 2013

Except and Intersect in SQL Server

EXCEPT and INTERSECT operators were introduced in SQL Server 2005. Both operator works on two result-sets.

Basic rules for combining two result-sets
  • No. of columns in both result-set should be equal
  • The order of columns should be same
  • Corresponding data type of each column in each select should be compatible
Syntax
SELECT col1, col2 FROM tab1
EXCEPT
SELECT col1, col2 FROM tab2

EXCEPT returns distinct rows from the first result-set which not exists in second result-set.

INTERSECT returns rows which exists in both result-set

Example
declare @tab1 table (col1 int, col2 varchar(10))
insert into @tab1
select 1, 'val1' union all
select 1, 'val2' union all
select 2, 'val1'

declare @tab2 table (col1 int, col2 varchar(10))
insert into @tab2
select 1, 'val1' union all
select 1, 'val3' union all
select 3, 'val1'

select col1, col2 from @tab1
except
select col1, col2 from @tab2

select col1, col2 from @tab1
intersect
select col1, col2 from @tab2
OUTPUT

Look at the Output
  • First output using EXCEPT where we are getting 2 rows which exist in table 1 but not in table 2
  • Second output using INTERSECT where we are getting 1 row which exists in both tables.

Oct 14, 2013

Row_Number in SQL Server

Row_Number (window function) was introduced in SQL Server 2005.

Row_Number generates a run-time column in the result set which generates sequential number to each row according to the column used in order by clause.

Syntax
Row_Number() over (order by col1, col2, ....n partition by col1, col2, ....n)
  • Order By is mandatory. Row Number is assigned in the result set based on the column provided in Order By clause.
  • Partition By is optional which groups the result set based on the column provided in Partition By clause wherein each group, the sequence starts with 1.
Let's create an Employee table on which we would see how it works.
create table tblEmployee(
    EmpId char(7)
    , FirstName varchar(50)
    , LastName varchar(50)
    , Gender char(1)
)

insert into tblEmployee
select 'EMP0001', 'Sandeep', 'Mittal', 'M' union all
select 'EMP0003', 'Abhay', 'Kumar', 'M' union all
select 'EMP0005', 'Priya', 'Gupta', 'F' union all
select 'EMP0002', 'Reema', 'Gupta', 'F' union all
select 'EMP0004', 'Ritesh', 'Kumar', 'M'

Now, we would generate a sequential number for all the employees using Row_Number.
select  EmpId, FirstName, LastName, Gender
        , row_number() over (order by EmpId) as RowNum
from    tblEmployee
OUTPUT
Row Number Order By EmpId

Check out the result set where RowNum is generated based on EmpId as provided in Order By.

Multiple columns can be used in the Order By clause.

Let's take an another example where we would use multiple columns in Order By clause.
select  EmpId, FirstName, LastName, Gender
        , row_number() over (order by FirstName, LastName) as RowNum
from    tblEmployee
OUTPUT
Row Number Order By Emp Name

In the next example, we will see how Partition By clause works
select  EmpId, FirstName, LastName, Gender
        , row_number() over (partition by Gender order by EmpId) as RowNum
from    tblEmployee
OUTPUT
Row Number with Partition By Gender Order By Emp Name

Check out the result set where RowNum is generated starting from 1 for each group i.e. Gender which is provided in Partition By clause

In Partition By clause also, we can use multiple columns as in Order By clause

Oct 7, 2013

Create EndPoint in SQL Server

In previous article, we learnt What is endpoint in SQL Server

In this article, we would learn how to create an Endpoint in SQL Server

Before creating an endpoint, we need to reserve an HTTP Namespace to expose the endpoint.

EXEC sp_reserve_http_namespace N'http://localhost:80/sql'

While creating endpoint you might face the below error


See how to resolve this error:
Msg 6004, Level 16, State 12, Line 1 User does not have permission to perform this action.

Reserved HTTP Namespace can be deleting using below command

sp_reserve_http_namespace N'https://localhost:80/sql'
Let's First create a function which we would expose using the endpoint


Create Function fn_EndPoint()
Returns Varchar(100)
AS
Begin
    Return 'My End Point'
End

Now lets create an endpoint that would expose the function "fn_EndPoint" that we created above.

Create Endpoint MyEndpoint
STATE = STARTED
AS HTTP
(                                 
    path='/sql/',
    AUTHENTICATION=(INTEGRATED),
    PORTS=(CLEAR),
    SITE ='localhost'
)
FOR SOAP
(             
    WEBMETHOD 'http://localhost/'.'GetEndPoint'         
   (     
        name='DatabaseName.dbo.fn_EndPoint',
        SCHEMA = STANDARD
    ),   
    WSDL = DEFAULT,
    BATCHES=DISABLED,
    DATABASE='DatabaseName'
)

In the next article, we will see how to start or stop endpoint in SQL Server

End Points in Sql Server

A SQL Server endpoint is the point of entry into SQL Server, or a way to connect to SQL Server instance.

Endpoints in SQL Server are similar to Web Services that expose database access over HTTP.
There are 5 system endpoints that are automatically created and that can’t be dropped (you can only start or stop them), one for each protocol
  • TCP/IP
  • Shared Memory
  • Named Pipe
  • VIA
One endpoint for the dedicated administrator connection (DAC).

Query to list all end points in SQL Server
select * from sys.endpoints
OUTPUT

Endpoints which have ID less then 65536 are system endpoints.

In the next article we will see how to Create Endpoint in SQL Server

System End Points can't be dropped, however they can be started or stopped.

To see how to start or stop an endpoint in SQL Server, read related blog post:
How to start or stop an endpoint in SQL Server

How to start or stop an endpoint in SQL Server

In earlier posts, we learn
In this post, we will see how to start or stop a SQL End Point

Let's first query sys.endpoints catalog view and see all the end points exists
select * from sys.endpoints
OUTPUT

To stop an endpoint:
ALTER ENDPOINT endpoint_name STATE = STOPPED

To start an endpoint:
ALTER ENDPOINT endpoint_name STATE = STARTED

SQL Server : Msg 6004, Level 16, State 12, Line 1 User does not have permission to perform this action.

You might get the following error while creating an End point in SQL Server.


This error is generated when a user is trying to create an endpoint but do not has the access.

Resolution: Contact Server Administrator and ask him/her to grant the Create Endpoint permission

Query to grant Create Endpoint permission
Grant Create Endpoint to username

Jul 24, 2013

Nested Transaction in Sql Server

In previous article, we learnt about transaction

In this article we will see how nested transactions work.

The variable @@TranCount is used check the count of running transaction(s)

In nested transactions, the variable @@TranCount can be used to check the count of level of nested transactions.

In nested transaction, commit works only on the same level as of transaction (current transaction) i.e. all the statements under that level of transaction will be committed where as rollback always works on parent transaction i.e. all the statements of all the levels will be rolled back.

NOTE: Rollback reverts all the changes even if any nested transaction was committed.

Let's take an example where we will have two level of transaction and we will commit the 2nd level transaction and rollback the 1st level transaction.
begin tran
print 'Tran Count on 1st level : ' + cast(@@trancount as varchar)
    insert into TableA select 'EMP003','Ritesh'   
    begin tran
    print 'Tran Count on 2nd level : ' + cast(@@trancount as varchar)
        insert into TableA select 'EMP004','Abhay'       
    commit tran
    print 'Tran Count after 2nd leve commit : ' + cast(@@trancount as varchar)
rollback tran
print 'Tran Count after 1st level rollback : ' + cast(@@trancount as varchar)
select * from TableA
OUTPUT

Look at the output, we inserted a row in the inner transaction (2nd level) and committed it but even then it is not inserted. This is because we have rolled back the outer transaction (1st level) which even rolled back the committed transaction (2nd level)

In the next example, lets try to rollback the inner transaction and then commit the outer one
begin tran
print 'Tran Count on 1st level : ' + cast(@@trancount as varchar)
    insert into TableA select 'EMP003','Ritesh'   
    begin tran
    print 'Tran Count on 2nd level : ' + cast(@@trancount as varchar)
        insert into TableA select 'EMP004','Abhay'       
    rollback tran
    print 'Tran Count after 2nd leve commit : ' + cast(@@trancount as varchar)
commit tran
print 'Tran Count after 1st level rollback : ' + cast(@@trancount as varchar)
select * from TableA
OUTPUT

See, we got an error here. This is because as I have already mentioned above that rollback works on parent level so it has rolled back all the transaction(s) so there are no transaction(s) left to commit or rollback.

Jul 23, 2013

Transaction in Sql Server

In this article, I am sharing the concept of transaction in SQL Server and how it is implemented.
Transactions run as a group of commands or queries as single execution unit. It ensures either all the commands or queries will be executed or none of them.

Once transaction is in open state, it needs to be either committed or rolled back using following commands
  • Begin Tran: To start a transaction.
  • Commit Tran: To commit all the executed statements.
  • Rollback Tran: To rollback all the executed statements.
Let's create a table and see how transaction works with some examples
create table TableA( empid varchar(10), empname varchar(10))

Let's insert some rows in the table within the transaction and rollback the transaction

begin tran
    insert into TableA
    select 'EMP001', 'Sandeep' union all
    select 'EMP002', 'Abhay'   
rollback
select * from TableA
OUTPUT

Look at the output, we inserted 2 rows but there is no row in the table as we have rolled back the transaction.

Now lets run the same statements with commit.
begin tran
    insert into TableA
    select 'EMP001', 'Sandeep' union all
    select 'EMP002', 'Abhay'   
commit
select * from TableA
OUTPUT

Look at the output now, we run the same statements with commit and this time the rows are inserted

In the next article, we will see how how nested transaction works.

Jul 21, 2013

jQuery Interview Questions - Part 1

Q: What is jQuery?
jQuery is a light weight JavaScript library which provides fast and easy way of HTML DOM traversing and manipulation, event handling, and client side animations, etc. One of the greatest features of jQuery is that it supports an efficient way to implement AJAX applications because of its light weight nature and make normalize and efficient web programs.

Q: Is jQuery a library for client scripting or server scripting?
jQuery is client scripting library.

Q: Which sign does jQuery use as a shortcut for jQuery?
$(dollar) sign.

Q: What does dollar Sign ($) means in JQuery?
Dollar Sign is nothing but it’s an alias for JQuery. Take a look at below jQuery code
$(document).ready(function(){  
});

Q: What are jQuery Selectors? 
jQuery Selectors are used to
  • find out DOM elements.
  • find the elements by ID, Class, Tag Name etc.
jQuery selectors always start with dollar sign and parenthesis : $()

Some examples of jQuery Selectors
Select element by tag name
$(div)
This will select all the div elements

Select elements by id
$(#mydiv)
This will select div with id "mydiv"

Select elements by class
$("clsdiv")
This will select all the div elements with class "clsdiv"

Q: What are different type of selectors in jQuery?
There are 3 types of selectors in jQuery
  • CSS Selector
  • XPath Selector
  • Custom Selector

Q: Does the jQuery html() method work for both HTML and XML documents?
jQuery html() only works for HTML.

Q: What does $("div") will select?
It will select all the div element in the page.

Q: What does $("div.parent") will select?
All the div element with parent class.

Q: What is the name of jQuery method used for an asynchronous HTTP request?
jQuery.ajax()


Next >>

Jul 12, 2013

Encrypt Stored Procedure

In SQL Server, stored procedures are generally created to hold the business logic of the application. For security reasons, you may want to hide your business logic from the end users.

With Encryption keyword is used to encrypt the definition of the stored procedure.

NOTE: Once stored procedure is encrypted it is not possible to get the definition of the stored procedure.

Before encrypting, developers have to save the original definition as a backup as it will be referred in case you need to check the business logic or in case any modification is required in the business logic.

For an example, Let's create an encrypted stored procedure using With Encryption keyword
create procedure encryptedProc with encryption
as
begin
    select 1
end

Now let's try to view the text/definition of stored procedure
sp_helptext encryptedProc
OUTPUT

Jun 25, 2013

Triggers in Sql Server : Part - 4

In earlier articles, we learnt
In this article, we will take an example of Instead of trigger and will see how it works.

In the example we are taking two tables,
  • Product for maintaining product master details
  • Product Log for logging on product master
With trigger we will create log in product_log table on performing insert/update/delete operations on product table

Script to create product and product_log Table
create table product (prod_id int, prod_desc varchar(10))
go
create table product_log (prod_id int, prod_desc varchar(10), action char(1))
go
insert into product values(1, 'prod-1')

Now lets create 3 triggers -
  • Instead of Insert
  • Instead of Update
  • Instead of Delete
on product Table which will create log in product_log table based on the operation performed.

create trigger tr_product_insert
on product
instead of insert
as
begin
    insert into product_log(prod_id, prod_desc, action)
    select prod_id, prod_desc, 'I' from inserted
end
go
create trigger tr_product_update
on product
instead of update
as
begin
    insert into product_log(prod_id, prod_desc, action)
    select prod_id, prod_desc, 'B' from inserted
    insert into product_log(prod_id, prod_desc, action)
    select prod_id, prod_desc, 'A' from deleted
end
go
create trigger tr_product
on product
instead of delete
as
begin
    insert into product_log(prod_id, prod_desc, action)
    select prod_id, prod_desc, 'D' from deleted
end

Let's perform an Insert operation on product table. On insertion tr_product_insert trigger will automatically execute and create log entries in product_log table.

insert into product values(2, 'prod-2')
select * from product
select * from product_log
OUTPUT


Look after Insert Operation, Trigger tr_product_insert inserted a log entry in product_log but actual Insert Operation on product table is not performed.

Now let's perform an Update Operation on product table. On updation tr_product_update trigger will automatically execute and create log entries in product_log table.

update product set prod_desc = 'prod-2' where prod_id = 1
select * from product
select * from product_log
OUTPUT


Look after Update Operation, Trigger tr_product_update inserted log entries in product_log but actual update operation on product table is not performed.

Now let's perform a Delete Operation on product table. On deletion tr_product_delete trigger will automatically execute and create log entries in product_log table.

delete from product where prod_id = 1
select * from product
select * from product_log
OUTPUT


Look after Delete Operation, trigger tr_product_delete inserted log entries in product_log but actual delete operation on product table is not performed.

<< Prev Home

Triggers in Sql Server : Part - 3

In earlier articles, we learnt
In this article, we will take an example of After Trigger and will see how it works.

In the example we are taking two tables, one for Sales and one for Stocks and with trigger we will update Stock table on performing insert/update/delete operations on Sales table

Lets' first create Stock and Sale Tables and populate some data in Stock Tabledata

create table stock(prod_id int, prod_name varchar(50), qty int)
go
insert into stock
select 1, 'Product-1', 10 union all
select 2, 'Product-2', 10
go
create table sale(bill_id int, prod_id int, qty int)

Now lets create 3 Triggers:
  • After Insert
  • After Update
  • After Delete 
on Sale Table which will update the Stock table based on the operation performed.

create trigger tr_sale_insert
on sale
after insert
as
begin
    update s set qty = s.qty - i.qty
    from stock s
    inner join inserted i on s.prod_id = i.prod_id
end
go
create trigger tr_sale_delete
on sale
after delete
as
begin
    update s set qty = s.qty + d.qty
    from stock s
    inner join deleted d on s.prod_id = d.prod_id
end
go
create trigger tr_sale_update
on sale
after update
as
begin
    update s set qty = s.qty + d.qty - i.qty
    from stock s
    inner join inserted i on s.prod_id = i.prod_id
    inner join deleted d on s.prod_id = d.prod_id
end

Let's first run a query to see the data of Stock Table

select * from stock
OUTPUT


Now let's perform an insert operation on Sale Table. On insertion tr_sale_insert trigger will automatically execute and update the Stock Table.
insert into sale values(1, 1, 5)
select * from stock
OUTPUT


Look at the Stock Table after insert operation. Trigger tr_sale_insert updated the qty of prod_id 1 from 10 to 5.

Now let's perform an update operation on Sale Table. On updation tr_sale_update trigger will automatically execute and update the Stock table.
update sale set qty = 3 where bill_id = 1 and prod_id = 1
select * from stock
OUTPUT


Look at the Stock Table after update operation. Trigger tr_sale_update updated the qty of prod_id 1 from 5 to 7.

Now let's perform delete operation on Sale Table. On deletion tr_sale_delete trigger will automatically execute and update the Stock table.
delete from sale where bill_id = 1 and prod_id = 1
select * from stock
OUTPUT


Look at the Stock Table after delete operation. Trigger tr_sale_delete updated the qty of prod_id 1 from 7 to 10.

In the next part, we will take an example of Instead of Trigger

<< Prev Home Next >>

Triggers in Sql Server : Part - 2

In Previous article, we learnt about what is trigger.

In this article, we will learn about Magic tables in triggers.

Magic Tables are logical tables which are created automatically when DML operations (insert/update/delete") are performed. These tables temporarily holds the data depending upon the operation and are accessible in triggers.

There are two types of magic tables
  • Inserted
  • Deleted
Magic Tables Inserted/Deleted are created depending on the DML operation "insert/update/delete" performed
  • Insert: Inserted table is created when an insert operation is performed and holds recently inserted data in the table.
  • Update: Both Inserted and Deleted tables are created when an update operation is performed. Inserted table holds the updated rows (new data) while deleted table holds the old data of the rows which are updated as a result of update statement.
  • Delete: Deleted table is created when delete operation is performed and holds recently deleted data from the table.
In the next article, we will discuss the examples of different types of triggers and how to use these magic tables in triggers.

<< Prev Home Next >>

Triggers in Sql Server : Part - 1

A Trigger is a special kind of stored procedure that automatically executes when an event occurs in the database.

Types of Triggers
  • DDL Triggers execute on data definition language (DDL) events like CREATE, ALTER, and DROP statements, and certain system stored procedures that perform DDL-like operations. 
  • DML Triggers execute on data manipulation language (DML) event like INSERT, UPDATE, or DELETE statements on a table or view. These triggers fire when any valid event is fired, regardless of whether or not any table rows are affected.
  • DML Triggers are of two types.
    • After Triggers: These triggers run after once insert, update or delete operation is executed on a table
    • Instead Of Triggers: These triggers run before insert, update or delete operation and do not let execute actual insert, update or delete performed on the table.
When a trigger is executed, magic tables "inserted/deleted" are automatically created and are accessible in the trigger.

In the next article, we will learn more about Magic Tables

Home Next >>

Jun 10, 2013

Collation Issues SQL Server

In previous article, we learnt about collation in SQL Server

In this article, we will discuss some of the common issues that encounters with collation.
Collation issues arises with string type of datataypes like char, nchar, varchar, nvarchar, text etc...
Common scenerio of collation issues
  • columns with different collations in where/on condition in a query
  • columns with different collations in union/union all
Lets take examples to understand the issues described above

First create two tables with different collation
create table tab1 (val varchar(10) collate Latin1_General_100_CI_AS)
create table tab2 (val varchar(10) collate Latin1_General_100_CS_AS)
insert into tab1
select 'ABC' union all
select 'DEF'
insert into tab2
select 'ABC'

Lets run a query with different collations with "on" condition
select    *
from    tab1 t1
inner join tab2 t2 on t1.val = t2.val
OUTPUT


Lets run a query with different collations with union

select val from tab1
union all
select val from tab2
OUTPUT

Cause: We are getting this error because collation of the columns used in the comparing condition are different.
Solution: In order to resolve the issue, we need to run the query with the same collation for both the columns. The simplest and easiest solution to resolve the same is to set the collation of both the columns as of database

select    *
from    tab1 t1
inner join tab2 t2 on t1.val collate database_default = t2.val collate database_default

select val collate database_default from tab1
union all
select val collate database_default from tab2
OUTPUT

Collation in SQL Server

Collation refers to a set of rules that determine how data is sorted and compared. Character data is sorted using rules that define the correct character sequence, with options for specifying case-sensitivity, accent marks, kana character types, and character width.

Types of collation sensitivity
  • Case Sensitivity
  • Accent Sensitivity
  • Kana Sensitivity
  • Width Sensitivity
Case Sensitivity
If A and a, B and b, etc. are treated in the same way, then it is case-insensitive.
A computer treats A and a differently because it uses ASCII code to differentiate the input. The ASCII value of A is 65, while a is 97. The ASCII value of B is 66 and b is 98.
  • CI specifies Case Insensitive 
  • CS specifies Case Sensitive
Accent Sensitivity
If a and A, o and O are treated in the same way, then it is accent-insensitive. A computer treats a and A differently because it uses ASCII code for differentiating the input. The ASCII value of a is 97 and A 225. The ASCII value of o is 111 and O is 243.
  • AI specifies Accent Insensitive 
  • AS specifies Accent Sensitive
Kana Sensitivity
When Japanese kana characters Hiragana and Katakana are treated differently, it is called Kana sensitive.

Width Sensitivity
When a single-byte character (half-width) and the same character when represented as a double-byte character (full-width) are treated differently then it is width sensitive.

Query to check collation and compatibility level of a database
SELECT compatibility_level, collation_name
FROM   sys.databases
WHERE  name = 'DatabaseName'

Query to find out all available collations in SQL Server database
SELECT    [name]
        , COLLATIONPROPERTY([name], 'CodePage') AS [CodePage]
        , COLLATIONPROPERTY([name], 'LCID') AS [LCID]
        , COLLATIONPROPERTY([name], 'ComparisonStyle') AS [ComparisonStyle]
        , COLLATIONPROPERTY([name], 'Version') AS [Version]
        , [description]
FROM    fn_helpcollations()

In the next article, we will explore,
common issues encountered with collation

Jun 8, 2013

yield keyword in c#

With yield keyword, the control moves from the caller to source and from the source back to the caller to and fro.

yield statement can be used in two forms
yield return <expression>;
yield break;

yield return statement returns each element at at time.
Yield return allows you to run custom iteration without temp collection.

Lets take an example to understand in more detail

Function to return RandomNumbers using List
static IEnumerable<int> GetRandomNumbers(int count)
{
    Random rand = new Random();
    List<int> ints = new List<int>(count);
    for (int i = 0; i < count; i++)
    {
        ints.Add(rand.Next());
    }
    return ints;
}

Same function using return yield without using any temp collection
using System;
using System.Collections.Generic;

namespace ConsoleApplication1
{
    class Program
    {
        static void Main(string[] args)
        {
            foreach (int i in GetRandomNumbers(10))
                Console.WriteLine(i);
        }     

        static IEnumerable<int> GetRandomNumbers(int count)
        {
            Random rand = new Random();           
            for (int i = 0; i < count; i++)
            {
                yield return rand.Next();
            }           
        }
    }
}
OUTPUT

See, in the above examples, both are performing the same thing, but in the first example we are creating temp collection "list" but in the second example with yield there is no need create any temp collection

yield break statement is used to break the iteration. break statement is used to terminate the loop but yield break is used to return from the method.

static void Main(string[] args)
{           
    foreach (int i in GetRandomNumbers(10))
        Console.WriteLine(i);
    System.Threading.Thread.Sleep(5000);           
}

static IEnumerable<int> GetRandomNumbers(int count)
{
    Random rand = new Random();
    for (int i = 0; i < count; i++)
    {
        yield return rand.Next();
        yield break;
    }
}
OUTPUT

May 28, 2013

Apply operator in Sql Server

Recently in a scenario, I used Cross Apply in a query and one of my colleagues asked me why and where to use Cross Apply and what is the difference between Cross Join and Cross Apply, so I thought of publishing an article related to same.

Cross Apply clause comes under Apply Operator which was introduced in SQL Server 2005.

The Apply operator acts like a Join without the ON clause. The Apply function in a query allows you to join a table to a table-valued function in such a way that function is invoked for each row returned from the table which you can't do with Join and is the main difference between Join and Apply

Apply operator can be used in two ways : Cross and Outer.
  • The Cross Apply only returns rows from the left side table if the table-valued-function returns rows.
  • The Outer Apply clause returns all the rows of the left side table regardless of whether table-valued-function returns any row or not. If no row is returned by table-valued-function, the columns that the table-valued-function returns are null.
Let's take an example to understand in more detail.

First create split function before running the below snippet.

declare @tab table(Category varchar(20), item varchar(max))
insert into @tab
select 'Vegetables', 'Carrot,Tomato' union all
select 'Fruits', 'Apple,Banana,Grape' union all
select 'Beverages', null

select t.Category, s.val as item
from   @tab t
cross apply dbo.split(item, ',') s

select t.Category, s.val as item
from   @tab t
outer apply dbo.split(item, ',') s
OUTPUT

Look at the output.
  • First output with Cross Apply: No row with Category "Beverages" in the output
  • Second output with Outer apply: Getting a row with Category "Beverages" in the output
Reason for difference:
  • Function is returning null value for Category "Beverages" because there is null value in item column for "Beverages"

May 19, 2013

Output Clause in SQL Server 2005

SQL Server 2005 introduced a new TSQL feature OUTPUT clause that allows you to retrieve data affected by insert/update/delete statements easily. The  OUTPUT clause returns the data that you've inserted or deleted from the table within the statement.

Basically OUTPUT clause has the access to magic tables (inserted and deleted) like triggers. The OUTPUT clause can be used to return results to the client or consume it on the server into a temporary table or table variable or permanent table  Let us take examples to understand how OUTPUT works.

First create a table Employee
CREATE TABLE Employee(
    EmpId VARCHAR(10), EmpName varchar(10), DOJ DATETIME
)

Example 1: Displaying the data just inserted with output clause within the same insert statement.
INSERT INTO Employee
OUTPUT inserted.*
SELECT 'EMP001', 'Sandeep', '01/01/2008' UNION ALL
SELECT 'EMP002', 'Abhay', '06/01/2008'
OUTPUT

In the above example we have inserted two rows in the Employee table and with OUTPUT clause we are displaying the rows we have just inserted from the same insert statement.

Example 2: Insert the data in other table on insertion and deletion of a table
DECLARE @TAB TABLE(
    EmpId VARCHAR(10), EmpName varchar(10), DOJ DATETIME, Action CHAR(1), LogTime DATETIME
)
INSERT INTO Employee
OUTPUT inserted.*, 'I', GETDATE() INTO @TAB
SELECT 'EMP003', 'Ritesh', '09/01/2008'

DELETE Employee
OUTPUT deleted.*, 'D', GETDATE() INTO @TAB
WHERE EmpId = 'EMP003'

SELECT * FROM @TAB
OUTPUT

In the above example first we have inserted and then deleted a row in the Employee table and with OUTPUT clause we have inserted both the inserted and deleted rows in the table variable from the inserted and deleted tables respectively. 

May 17, 2013

Customize a TFS Work Item to create new Work Item

Prerequisite:
  • To export or list work item types, you must be a member of the Project Administrators group or have your View project-level information permission set to Allow.
  • To import work item types, you must be a member of the Team Foundation Administrators security group or the Project Administrators security group.
We can customize a Work Item Type to create a new Work Item Type. Many organizations use the term defect in place of Bug and they are comfortable to keep the same term in TFS also. We will use a tool built in TFS 2010; called WitAdmin to create a new work item type Defect from Bug work item type. We will begin with getting the definition of work item of the Bug type and modify it to create a new work item type Defect.

Steps

1. Open the Visual Studio 2010 command prompt and run it as Administrator.


2. We begin with getting the Bug work item type definition in a XML file. Enter the following command:


   Operation complete message will appear.


Now we have the Bug work item type definition in XML file, we will edit it in Notepad. 3. In Window Explorer, find Bug.xml and open it for editing.


4. It will open it in Notepad where we can edit it.


5. Change the name from Bug to Defect and save the file.


6. Enter the command:


  The work item type import has completed message will appear.


7. You may now start Visual Studio 2010, open Team Explorer and browse to the Team Project named EngageTest. Expand to the Work Items node and right click on it. Select the option New Work Item and you will find Defect appear in the list.


Customizing Work Item Workflow in TFS 2010

Prerequisites:
  • Team Foundation Server 2010
  • Microsoft Visual Studio 2010
  • TFS Power Tools
You must be a member of the Team Foundation Administrators security group or the Project Administrators security group.

When you install TFS Power Tools you get an additional menu option called Process Editor under Tools menu in Visual Studio 2010.


The Process Editor allows us to customize work item type workflow. For example, we can customize the Bug Work Item Workflow by clicking Work Item Types and selecting Open WIT from Server.


This brings up a dialog box with the available TFS Projects. So if we want to customize Bug Work Item we expand the desired TFS Project node and select Bug work item.


Selecting Bug Work Item Type opens the work item in Visual Studio tab. Click the Workflow tab to customize the associated workflow.


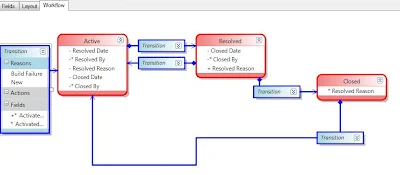
The original workflow for Bug Work Item Type takes bugs from Active to Resolved and finally Closed. Additionally bug can be sent back to Active state either from Resolved or Closed.


Now we want to add another state Awaiting Approval so that when a bug resolved it should go to Closed state only after approval. We do this by adding a new State object to the workflow from the toolbox.


Double click the new State and name it “Awaiting Approval”.


To connect the Workflow states, Click the Transition Link tool in toolbox and click the Resolved state and connect it to Awaiting Approval state. Repeat the same process for Awaiting Approval state to Active state.


When two state objects have been connected by a transition link we see a new blue transition object. We can click the downward-pointing double arrow to modify transition object.


Each transition must be given a reason which explains why the workflow progressed from one state to the next.
To set the reason why the workflow goes from Awaiting approval to Accepted we double-click the transition object connecting them. This brings up the Workflow Transition dialog.


We switch to the Reasons tab to set the reason(s) the change in state can occur. Simply click New to add a new reason.


In this case we say there are two reasons a Bug item can go into the Awaiting Approval state:
  • Waiting to be accepted by Client (this is default).
  • Waiting to be accepted by Product Manager.
First we’ll add the default reason, when the client’s acceptance is required.


We’ll also add the second reason, when product manager’s acceptance is required.


Now we have two reasons for a Bug going into Awaiting Approval state.

Similarly, add reasons for a Bug going into Active state from Awaiting Approval.
  • Rejected by Client.
  • Rejected by Product Manager.
There is one more thing left. Bug can progress to Closed state once it is approved. So we need to modify the workflow that sends a Bug from Resolved to Closed.
To do so double click on the transition state that links Resolved to Closed. This opens up Workflow Transition dialog box. On Transition Detail tab select Awaiting Approval in from dropdown.


This will link Awaiting Approval state to Closed state.


You can add reason to this transition like Approved by Client or Approved by Product Manager.

Also read, related post
Customize a TFS Work Item to create new Work Item