In this post, I am going to demonstrate Step by Step Example of importing a Flat File which contains both Header and Detail Records with different formats in the SQL Server Database header & detail tables respectively using SSIS.
Prerequisite
Flat file Header/Detail Record Specs
Script for Header & Detail Tables
Step 1: Add a Data Flow Task to Control Flow.
Step 2: Add a Flat File Source to the Data Flow.
Step 3: Configure Flat File source.
Step 4: Add Script Component from Data Flow Transformations and connect Flat File Source to it
Step 5: Double click on Script component and Configure the Input Columns like below
Step 6: Configure Output under Inputs and Outputs tab like below as per Header & Details specifications.
Step 7: Click on Edit Script and write following code in the script window under Input0_ProcessInputRow method
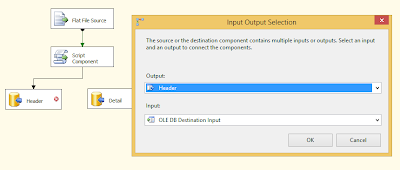
Step 8: Add two OLE DB destination for Header and Detail and connect Header and Detail output of Script Component to each destination respectively.
Step 9: Configure OLE DB destination for Header & Detail like below
Step 10: Now let's execute the package
Step 11: Package is executed successfully. Now let's check for the data in the tables.
Prerequisite
- An Input File Input.txt with header and detail records
- Header & Detail Tables in the database
H1100
D1050P1
D1050P2
H2200
D2100P3
D2100P4
D1050P1
D1050P2
H2200
D2100P3
D2100P4
Flat file Header/Detail Record Specs
Script for Header & Detail Tables
CREATE TABLE [dbo].[Header](
    [id] [varchar](50) NOT NULL,
    [amount] [int] NOT NULL
)

CREATE TABLE [dbo].[Detail](
    [id] [varchar](50) NOT NULL,
    [amount] [int] NOT NULL,
    [product] [char](100) NOT NULL
)
Step 1: Add a Data Flow Task to Control Flow.
Step 2: Add a Flat File Source to the Data Flow.
Step 3: Configure Flat File source.
- Select file name (Input.txt)
- Set Format as "Ragged Right"
Step 4: Add Script Component from Data Flow Transformations and connect Flat File Source to it
Step 5: Double click on Script component and Configure the Input Columns like below
Step 6: Configure Output under Inputs and Outputs tab like below as per Header & Details specifications.
Step 7: Click on Edit Script and write following code in the script window under Input0_ProcessInputRow method
public override void Input0_ProcessInputRow(Input0Buffer Row)
{
    if (Row.Line.Substring(0, 1) == "H")
    {
        HeaderBuffer.AddRow();
        HeaderBuffer.id = Row.Line.Substring(1, 1);
        HeaderBuffer.amount = Convert.ToInt16(Row.Line.Substring(2, 3));
    }
    else if (Row.Line.Substring(0, 1) == "D")
    {
        DetailBuffer.AddRow();
        DetailBuffer.id = Row.Line.Substring(1, 1);
        DetailBuffer.amount = Convert.ToInt16(Row.Line.Substring(2, 3));
        DetailBuffer.product = Row.Line.Substring(5, 2);
    }
}
Step 8: Add two OLE DB destination for Header and Detail and connect Header and Detail output of Script Component to each destination respectively.
Step 9: Configure OLE DB destination for Header & Detail like below
Step 10: Now let's execute the package
Step 11: Package is executed successfully. Now let's check for the data in the tables.
select * from Header
select * from Detail
OUTPUT


No comments:
Write Comments